Using a laser for floor works: how to avoid measurement errors
By Staenis | 13/05/2026
A laser is almost indispensable for floor works: you use it to set out heights, create reference lines and lay a floor perfectly flat or with the correct slope. Incorrect use, however, can be the very thing that causes measurement errors.
In this blog you'll read how to set up a laser correctly for screed, levelling compound, dry floors and when installing the Staenis grid. Want to know straight away which build-up suits your project? Have a look at the floor build-ups or the Staenis levelling grid.
In short
- Set up the laser stably and safely, and don't move it once it's in the right position.
- Mark reference lines on as many walls as possible right away as control points.
- Use the laser receiver (beeper) with care and remove any reflective foils and shiny materials.
- Above all, look at the accuracy in the technical datasheet, not just at the type of laser.
- A 360° laser is convenient, but not automatically more accurate than a 180° laser.
- Handle your laser with care and check it regularly.
Why a laser is so handy for floor works
With a laser you work throughout a whole room from the same reference height. That keeps the floor at the same level everywhere and lets you set out the build-up in a controlled way. A laser is especially useful for:
- determining the finished floor level;
- finding the highest point of the existing substrate;
- setting out the screed height and the top of the grid;
- adjusting the legs and slats of the Staenis grid to the correct height;
- checking level differences when levelling or for a dry floor;
- setting out a slope, for example for a terrace or a drainage area.
A good laser set-up is therefore the basis for a flat, controllable floor build-up. See which Staenis systems suit your project.
Don't move the laser once it's in the right position
One of the most important rules: once your laser is set up correctly, leave it where it is. If you move it during the work, it's extremely hard afterwards to find exactly the same height again. Even a small shift or a slight difference in height can affect your measurements.
So set up the laser in the right spot from the start and leave it there until your main heights have been set out. If you do have to move it, first make sure there are enough reference points on walls, columns or other stable elements.
Mark reference lines on as many walls as possible
Once the laser is in position, it's best to mark reference lines on as many walls as possible right away. You can do this with a pencil line, a mark on painter's tape or a clear stroke. That way you always have control points if the laser later has to be moved or is accidentally bumped.
- At each reference line, clearly note what it represents: laser reference, top of the grid, top of the screed, or finished floor level.
- Work from a fixed reference, for example 1 metre above the finished floor level, and always calculate back from there.
- Carry the references over into adjacent rooms as well, so thresholds and joints line up.
- Avoid each room ending up with its own, slightly different reference.
Set up the laser in a safe spot
A laser that gets bumped or stands on an unstable surface gives less reliable readings. So don't set up the laser in the walkway or anywhere someone could accidentally knock into it.
- Preferably use a sturdy tripod or a stable, solid surface.
- Avoid loose boards, vibrating surfaces or spots right next to bags of screed or insulation.
- Keep the laser away from hoses, cables and doors that open and close.
- Working with several people? Agree clearly that the laser must not be touched or moved.
Set up even a self-levelling laser as level as possible
Many construction lasers are self-levelling and automatically correct small deviations. That doesn't mean you can just set them up at an angle. A self-levelling laser always has a limited levelling range: if it's tilted too far, it won't level correctly or will display an error.
Even within that range, you work more accurately if you set up the laser itself as level as possible. So check that the tripod is steady, that the laser isn't wobbling and that it has had enough time to finish self-levelling before you start measuring.
Be careful with the beeper or laser receiver
A laser receiver, often called a beeper, is handy in bright light, outdoor work or at greater distances. It shows where the laser beam is, often with arrows, an audio signal or a display. But beware: a beeper can cause deviation if you don't use it correctly.
- Set the receiver to the fine measurement mode if your device has one.
- Clamp it firmly to a straight measuring rod and hold the rod vertically.
- Always read from the same side or from the middle of the laser line.
- Wait until the signal is stable before recording a measurement.
- Check regularly against a fixed reference line on a wall.
Remove reflective foils before using the beeper
Reflection is one of the most common causes of measurement errors. So remove or cover as many reflective or shiny materials as possible before measuring with a laser or beeper:
- aluminium foil or reflective foil on insulation;
- shiny profiles and metal slats;
- windows, mirrors and glossy tiles;
- wet or glossy surfaces in the work area;
- packaging, plastic foils or films of building materials still lying around on site.
Reflections can make you see a false laser line or cause the beeper to react to a reflection instead of the actual laser beam. In floor works, such a small error can later become visible in the joints or in the flatness of the finish.
What types of lasers are there?
There are different types of construction lasers. The best choice depends on the room, the application and the required accuracy.
180° line laser
A 180° line laser projects a line across part of the room and is often compact and easy to use. For smaller rooms or work along one or more walls, that's usually enough. Important to remember: a good 180° laser can be more accurate than a cheaper 360° laser. So always check the technical accuracy too.
360° line laser
A 360° laser projects a line all the way around the room. That's handy in larger rooms and when you want a reference line on all walls in one go. A 360° laser isn't automatically more accurate than a 180° laser, though. For floor works, what matters most is the stated accuracy of the device.
Rotary laser
A rotary laser spins around and creates a horizontal plane. It's often used on larger construction sites, outdoors or over longer distances, usually combined with a laser receiver. For floor works, this setup requires extra attention to reflections and correct use of the beeper.
Slope laser
A slope laser can set out a controlled incline. That's useful for applications where water needs to run off, such as terraces, showers or drainage areas. Decide in advance exactly how much fall you need and in which direction the water has to flow.
Red or green laser
Lasers often come with a red or green beam. A green laser is usually more visible to the eye, especially indoors and in bright light. But more visible doesn't automatically mean more accurate. Always check the stated accuracy, range and self-levelling range in the technical datasheet.
Accuracy matters more than lots of features
For floor works you want as little deviation as possible. A laser that looks handy because of its features isn't necessarily the best choice if it's less accurate. So always check the stated deviation per metre or per number of metres in your laser's technical datasheet.
The greater the distance, the more strongly any deviation makes itself felt. A wide laser line can also be harder to read precisely: decide whether you measure on the top, bottom or middle of the line, and stick to the same method consistently. For floor works, choose an accurate laser rather than just one with many features.
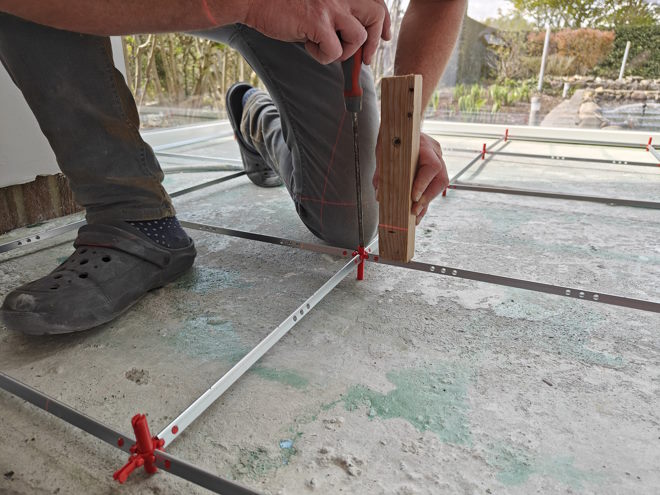
How to use a laser when installing the Staenis grid
When installing the Staenis levelling grid or the Staenis compound levelling grid, the laser helps you bring the floor build-up up to height in a controlled way.
1. Set the finished floor level
Start with the question of where the finished floor needs to end up. Take into account the thickness of the floor finish, tile adhesive or underlay, boards such as OSB or Fermacell, the screed, any underfloor heating and the connection with thresholds and other rooms.
2. Find the highest point of the existing substrate
Measure the distance between the laser line and the substrate at various points. Where that distance is smallest, the substrate is highest. That highest point determines the minimum build-up height of your floor.
3. Set out a clear reference height
Mark a fixed line on the wall, for example 1 metre above the finished floor level. From there, you can always work back to the top of the grid, the top of the screed or a levelling layer, and the final floor finish.
4. Set the grid to the correct height
Use the laser to set the legs and slats of the Staenis grid correctly. Check not just at the edges but also at several points across the room. For the practical installation, you can also consult the photo guide for screed.
5. Check again before filling the floor
Check the height one last time before applying screed, levelling compound, insulation screed, drainage mortar or dry fill. Correcting a mistake is much easier as long as the floor hasn't been filled yet.
Common mistakes when using a laser
- Moving the laser without first having marked enough reference lines.
- Putting the laser right in the middle of the work area, where someone can easily knock into it.
- Relying on a single marking instead of several reference lines.
- Leaving the beeper on a coarse measurement setting instead of the fine one.
- Not removing reflective foils or shiny materials before you start measuring.
- Holding the measuring rod at an angle or reading it from a different side each time.
- Mixing up different reference heights, such as the laser line, top of the screed and finished floor level.
- Failing to check the laser's accuracy after a fall, a knock or intensive transport.
Handle your laser with care
A laser is a measuring instrument. A fall, a hard knock or rough transport can affect accuracy, even if the device still appears to work. A laser that measures a few millimetres off can cause a visible problem in the finish on floor works.
- Always store and carry your laser in its case and lock the pendulum if the device requires it.
- Protect the laser from drops, dust and moisture on site.
- Always work with full batteries or sufficiently charged accumulators so the device stays stable.
- Regularly check that the laser still measures correctly by working with a fixed reference line on a wall.
- Have the device checked or calibrated if it has been dropped or if you have any doubt about its accuracy.
Checklist: measuring correctly with a laser
- The laser stands stably, on a tripod or solid surface.
- The laser is set up safely, out of the walkway and away from vibrations.
- The laser is set up as level as possible and has finished self-levelling.
- The battery or accumulator is sufficiently charged for the duration of the work.
- Reflective foils and shiny materials have been removed or covered.
- Clear reference lines are marked on several walls.
- Next to each reference line, its meaning is noted.
- The measuring rod is held vertically and read the same way every time.
- The beeper is set to the fine mode, firmly clamped in place, and you wait for a stable signal.
- The height of the grid or the screed has been checked before filling.
Conclusion
A laser is almost indispensable for floor works, but only if you use it correctly. Set it up stably and as level as possible, don't move it unnecessarily and immediately mark reference lines on as many walls as possible. Use a beeper with care, remove reflective materials and choose a device with as little deviation as possible. A 360° laser is handy, but not automatically more accurate than a 180° laser.
See which Staenis systems suit your floor build-up, calculate quantities and an indicative price using the Staenis calculator, or order the right products from the Staenis webshop.
Frequently asked questions
Can I move my laser during floor works?
Better not. Once your laser is set up correctly, leave it where it is. If you do move it, it's hard to find exactly the same height again. So first mark reference lines on as many walls as possible as control points.
Is a 360° laser always better than a 180° laser?
No. A 360° laser is handy because it projects a line all around, but it isn't automatically more accurate. For floor works, what mainly matters is the stated accuracy of the device. A good 180° laser can be more accurate than a cheaper 360° laser.
Why do I have to remove reflective foil before I use the beeper?
Reflective foil, shiny insulation, metal, glass or wet surfaces can bounce the laser beam back. As a result, you can see a false line or the laser receiver can react to a reflection instead of the actual laser beam.
Is a beeper or laser receiver always accurate?
A beeper is handy in bright light or at greater distances, but it has to be used correctly. Set it to the fine mode, clamp it firmly to a straight measuring rod, hold the rod vertically and avoid reflections. Used incorrectly, a beeper can cause deviation.
Do I still need to level a self-levelling laser?
Yes, as well as possible. A self-levelling laser corrects small deviations, but always has a limited levelling range. The more stably and straight you set it up, the smaller the chance of measurement errors.
What do I use a laser for with the Staenis grid?
You use the laser to set the finished floor level, find the highest point of the substrate, mark a fixed reference height and then set the legs and slats of the Staenis grid to the correct height.